Assignment #5
Conditional Statements (“if, then, else”) - A conditional is one of the most powerful and important aspects of coding. It is a line of code where you check if something is true and then you can do or not do something accordingly. A conditional statement is a statement with a hypothesis, followed by a conclusion. We use conditional statements when we say “if this (P) happens, then that (Q) will happen.” In the sentence, P is a hypothesis and Q is a conclusion. Only if P happens to be true, then Q can happen. Let’s look at some examples.
Examples:
Examples:
- If you work over time, then you will be paid time and a half. The hypothesis is that you work overtime and the conclusion is that you will be paid time and a half for the overtime pay.
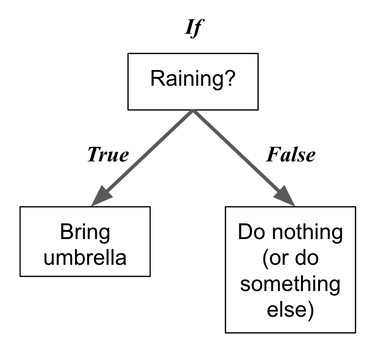
- If it rains outside, then I will bring an umbrella. The hypothesis is that it’s raining outside and the conclusion is that I need to bring an umbrella. A visual representation of this decision-making process is shown in the “flowchart” below:
Sometimes, we have to re-write our ideas so that they sound like if-then statements. This helps us be able to code then easier.
Examples:
Examples:
- I get cake on my birthday. We would re-write this to be if-then by saying: If it is my birthday, then I get birthday cake. When we write code, we would check the date to see if it matches my birthday and if that is true, then I would get the birthday cake.
- Senior citizens are over 60 years old. We would re-write this to be if-then by saying: If you are over 60 years old, then you are a senior citizen. When coding, we would check or calculate the age of the person first, then see if they are over 60 years old, then define them as a senior citizen if old enough.
Boolean Operators (“and, or, not”) - The Boolean Operators “and, or, not” can be used to test multiple conditions. For example, we want to read the value from the joystick and see if X is 1023. Only if X is 1023 do we want to print “Hello World” to the screen. First, we need the code to read the value of X and then see if it is 1023.
X=analogRead(xPin); //read value of X from the pin
If (X==1023){ // check if X is 1023
Serial.print(“Hello World”); //if X is 1023 (if statement was true), then the code will do this line.
}
Hint: You must use parenthesis for the conditional statement.
Hint: You must use curly brackets for the conclusion.
Hint: If you use just one equal sign in the conditional, the code does not run. Be sure to use == which is used to check if something is true. We use = to assign values to variables.
Hint: Only if the conditional is true, will the part in the curly bracket be done. If the conditional is false, then the code moves to the next line after the closing curly bracket.
Using Boolean Operators - We can make more complex statements to check if we want. For example, we can put a chain of conditional statements together to check if two things are true at the same time before we do something else.
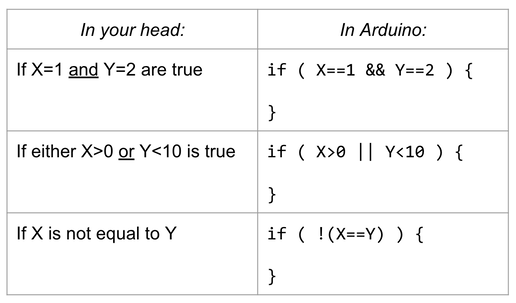
Example: Let’s say we want the fruit to be an apple and we want the apple to be green before we decide to eat it. Then, we need to use the Boolean operator AND, which in Arduino means that we need to check if condition 1 is true AND if condition 2 is true. To check if a statement is true, we use the symbol == to see if the values match. To say AND in Arduino, we use the symbol &&. Only if both statements are true will the code read the line inside the curly brackets.
If (fruit==apple && apple== green){
//eat the apple
Serial.print(‘You can eat the apple”);
}
“Else, Else-If” - Sometimes we have several possibilities that can occur. If the conditional is true, we want to do something. If the conditional is false, we may want to do something new. This can be done in computer coding using the If-Else statement. Only if the conditional is true will the code do what is inside the curly brackets. Reference: Else
Example: Let’s say you want to study the temperature inside your house. If the temperature is 70 deg or more, we want the heater to stop running. If the temperature is between 60 and just under 70 deg, then we want to run the heater to warm up the house. If the temperature is less than 60 deg, then we want to print a warning that we have heating problems. How do we code this??
First, we need to create a variable called temperature and read the temperature in the room. Let’s look at how we use the Boolean operators to create an Arduino code. We first check if the temperature is greater than or equal to 70 degrees (conditional #1). If that is true, then we want to turn off the heater. Next, we check if the temperature is between 60 and less than 70 deg (conditional #2). If conditional #2 is true, then we turn on the heater. The only other possibility is that the temperature is less than 60 deg. We can use ELSE here to represent this possibility (it means otherwise).
if (temperature >= 70) {
// Turn off the heater
}
else if (temperature >= 60) {
// 60 <= temperature < 70
// Run the heater
}
else {
// temperature < 60
// Display a warning-the heating is not working
}
Hint: Notice that we can use greater than or equal to with the symbols, >= (click for reference)
Hint: You must use parenthesis for the conditional statement.
Hint: You must use curly brackets for the conclusion.
The code reads the lines from top to bottom. If the first conditional is true, the part in the curly brackets right after the IF statement is done by the code and then the code does not check the second or third conditionals. If the first conditional is false, the code skips to the second conditional. If the second conditional is false, it skips to the third conditional. If ALL conditionals are false, the code checks all conditionals and but does nothing (i.e. it does not go inside the curly brackets ever and it does not execute those lines of code).
Exercise 1. Run the code in the IDE with the Elegoo UNO board only
- Connect the UNO board to the computer
- Copy and paste the code below and run in the IDE software
- Check the results in the serial monitor
a) If the X value is zero, let's print the "Hello World" in the Serial monitor
--------------------------------------------------------------------------------------
int X = 0;
void setup() {
Serial.begin(9600);
}
void loop() {
if (X == 0){
Serial.println("Hello World");
delay(500);
}
}
--------------------------------------------------------------------------------------
Question 1-a) What happened when you ran the code?
b) If the X value is zero, print the “Hello World”. Else, do nothing.
--------------------------------------------------------------------------------------
int X = 10;
void setup() {
Serial.begin(9600);
}
void loop() {
if (X == 0){
Serial.println("Hello World");
delay(500);
}
else {
}
}
--------------------------------------------------------------------------------------
Question 1-b) Change the X value to 10 (X = 10), what happened when you ran the code?
c) If the X value is zero, print the “Hello World”. Else if x=10, print the “how are you?”, and else print the “see you later
--------------------------------------------------------------------------------------
int X = 10;
void setup() {
Serial.begin(9600);
}
void loop() {
if (X == 0){
Serial.println("Hello World");
delay(500);
}
else if (X == 10) {
Serial.println("How are you?");
delay(500);
}
else {
Serial.println("See you later");
delay(500);
}
}
--------------------------------------------------------------------------------------
Question 1-c) Change the X value based on the questions below
--------------------------------------------------------------------------------------
int X = 0;
void setup() {
Serial.begin(9600);
}
void loop() {
if (X == 0){
Serial.println("Hello World");
delay(500);
}
}
--------------------------------------------------------------------------------------
Question 1-a) What happened when you ran the code?
b) If the X value is zero, print the “Hello World”. Else, do nothing.
--------------------------------------------------------------------------------------
int X = 10;
void setup() {
Serial.begin(9600);
}
void loop() {
if (X == 0){
Serial.println("Hello World");
delay(500);
}
else {
}
}
--------------------------------------------------------------------------------------
Question 1-b) Change the X value to 10 (X = 10), what happened when you ran the code?
c) If the X value is zero, print the “Hello World”. Else if x=10, print the “how are you?”, and else print the “see you later
--------------------------------------------------------------------------------------
int X = 10;
void setup() {
Serial.begin(9600);
}
void loop() {
if (X == 0){
Serial.println("Hello World");
delay(500);
}
else if (X == 10) {
Serial.println("How are you?");
delay(500);
}
else {
Serial.println("See you later");
delay(500);
}
}
--------------------------------------------------------------------------------------
Question 1-c) Change the X value based on the questions below
- What happened when you ran the code with X =0?
- What happened when you ran the code with X =10?
- What happened when you ran the code with X =5?
Exercise 2. Run the code in the IDE with the Elegoo UNO board and joystick module
- Copy and paste the code below and run in the IDE software
- Check the results in the serial monitor
- Wire the joystick and refer to the Assignment #4
a) If you move the joystick module left side (in +X, away from the pins), print the “Hello World” in the Serial Monitor.
--------------------------------------------------------------------------------------
int xPin = A0;
int xPin_Value = 0;
void setup() {
Serial.begin(9600);
}
void loop() {
xPin_Value=analogRead(xPin);
if (xPin_Value > 512){
Serial.println("Hello World");
delay(500);
}
}
--------------------------------------------------------------------------------------
Question 2-a) What happened when you ran the code?
b) If you move the joystick module left side (in +X, away from the pins), print the “Hello World”. Else, do nothing.
--------------------------------------------------------------------------------------
int xPin = A0;
int xPin_Value = 0;
void setup() {
Serial.begin(9600);
}
void loop() {
xPin_Value=analogRead(xPin);
if (xPin_Value >512){
Serial.println("Hello World");
delay(500);
}
else {
}
}
--------------------------------------------------------------------------------------
Question 2-b) Move the joystick to the left side (in +X, away from the pins), what happened when you ran the code?
c) If you move the joystick to the left (in +X, away from the pins), print the “Hello World” and if you move the joystick module to the right (in -X, towards the pins), print the “how are you?”, and otherwise print “see you later”
--------------------------------------------------------------------------------------
int xPin = A0;
int xPin_Value = 0;
void setup() {
Serial.begin(9600);
}
void loop() {
xPin_Value=analogRead(xPin);
if (xPin_Value > 512){
Serial.println("Hello World");
delay(500);
}
else if (xPin_Value < 512) {
Serial.println("How are you?");
delay(500);
}
else {
Serial.println("See you later");
delay(500);
}
}
--------------------------------------------------------------------------------------
Question 2-c) Change the joystick X axis based on the questions below
- What happens when you move the joystick to the left side (in +X, away from pins)?
- What happens when you move the joystick to the right side (in -X, toward the pins)?
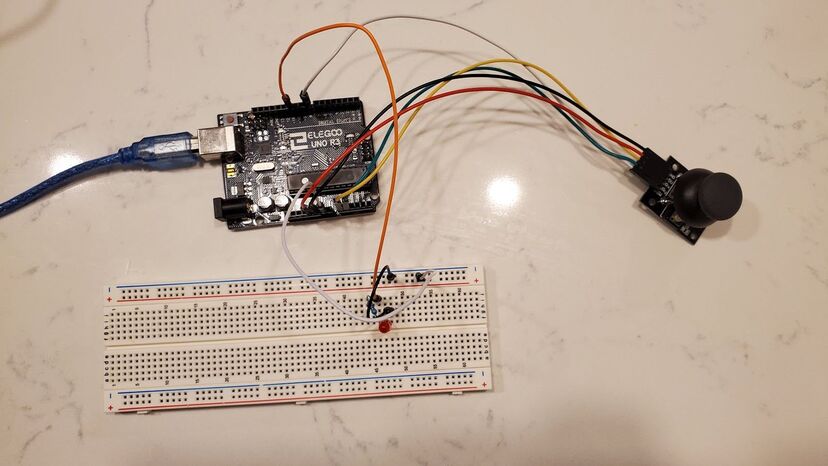
Exercise 3. Turn on the LED when you move the joystick in x to the right
Step 1. Wiring -
- Wire up the joystick to the Arduino board (refer to the Assignment #4)
- Wire a LED and a resistor to the breadboard (refer to the Assginment #3)
- Comment: For Project 2, you will be using the joystick to control the motors and move your robot in both X and Y. You will need these skills to read the values of X and Y from the joystick, decide which motor(s) to turn on, and decide when to stop running the motors.
Step 2. Coding - Refer to the coding part of Assignment #3 and #4 for using the joystick and turning on the LED before going to the coding of conditional-control
(3) Set the LED_R pinMode as OUTPUT
(4) To communicate, start the Serial communication with (9600)
- Variables - set the variables for the joystick as xPin = A0; yPin = A1; KeyPin = 8. To save your joystick data, set the other three variables as xValue, yValue, zValue. Meanwhile, set the variable for LED as "LED = 11"
- Setup - (1) Set the “KeyPin” mode as INPUT_PULLUP
(3) Set the LED_R pinMode as OUTPUT
(4) To communicate, start the Serial communication with (9600)
- Determine the default value - Read your x-value without moving the joystick. which is the default value of your joystick. (see the figure below, however, it's not always 512. The default value could be different by sensor)

Step 3. Coding - Now we start to work on the coding for the loop part, where we need to write the conditional statement
Hint: Use the if/else statement to make the conditional statement and the Boolean operator to check if the x-value is greater than your default value. How do you do greater than? Click here for reference
Hint: To turn off the LED, the digitalWrite will be “LOW”
- If the joystick moves to the right (-X, toward the pins), then turn on the LED
Hint: Use the if/else statement to make the conditional statement and the Boolean operator to check if the x-value is greater than your default value. How do you do greater than? Click here for reference
- If the joystick does not move to the right in X, then we want the LED to be off.
Hint: To turn off the LED, the digitalWrite will be “LOW”
Output
Click the link for the output video: https://photos.app.goo.gl/mLPrEGTyt1FAr1TY7
Exercise 4. Turn on the different LEDs based on the joystick movement
You will need to modify your circuit - Add components to Exercise 3 circuit, so that:
- When you move joystick move to left (in +X, away from pins, xValue > 512), Turn on the Red LED
- When you move joystick move to right (in -X, towards the pins, xValue < 512), Turn on the Green LED
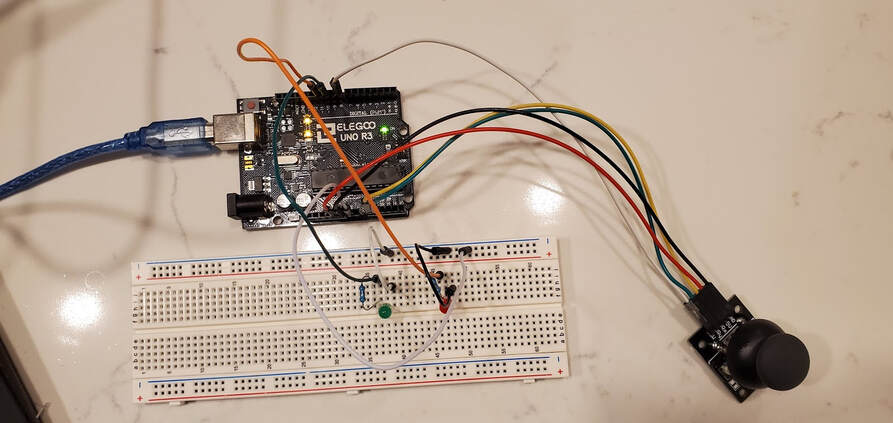
Step 1. Preparation - To add one more LED, please prepare additional components : Green LED( (1), 10kΩ resistors (1), Jumper wires(2)
Step 2. Wiring - Add wiring for the Green LED to the breadboard (Refer to Assignment #3)
Hint : When the joystick is not moved, x Value default may be 512. If not 512, use your default value instead. My default was 503 so I will use 503.
Hint : When you move the joystick to the left, the xValue is less than your default value, i.e. less than 512.
Hint: LED is a digital signal. Remember, use digitalWrite.
Hint: LED is a digital signal. Remember, use digitalWrite.
Otherwise, if the joystick does not move to the left or to the right, then we want both of the LEDs off. This is a third conditional statement.
Hint: You can use the “else” statement for the third conditional statement.
Hint: xValue is not more and not less than your default value, then set both LED_R and LED_G as Low
Step 2. Wiring - Add wiring for the Green LED to the breadboard (Refer to Assignment #3)
- Connect GND to the (-) rail on your breadboard
- Connect the LED signal on the UNO board to Digital pin 10
- Be sure to include the 10KΩ resistor to avoid damaging your LED
- Add one more Global variable to the top of your code. Set Green LED as “LED_G = 10”
- Set the pinMode for the pin LED_R as OUTPUT
- To change the control input, we need to modify if/else statement from Exercise 3.
- Write the code to turn on the Red LED when you move the joystick to left
Hint : When the joystick is not moved, x Value default may be 512. If not 512, use your default value instead. My default was 503 so I will use 503.
Hint : When you move the joystick to the left, the xValue is less than your default value, i.e. less than 512.
- If the joystick moves to the left, then turn on the red LED.
Hint: LED is a digital signal. Remember, use digitalWrite.
- If the joystick is moved to the right, then turn on the green LED.
Hint: LED is a digital signal. Remember, use digitalWrite.
Otherwise, if the joystick does not move to the left or to the right, then we want both of the LEDs off. This is a third conditional statement.
Hint: You can use the “else” statement for the third conditional statement.
Hint: xValue is not more and not less than your default value, then set both LED_R and LED_G as Low
Output
Click the link for the output video: photos.app.goo.gl/37zPmis4kjxFL3Ya6
Submitting the Assignment
- For Ex. 1 and 2, answer the questions. For Ex. 3 and 4, take a photo of your circuit, and a screenshot of the IDE and serial monitor. Compile these into a Word document using the template we provide, and submit as a PDF.
- Late penalty: This assignment is due Friday at 6 PM. If submitted late, and less than 24 hours from the due date, 10% will be deducted from the total score, 20% will be deducted if between 24-48 hours etc. Be sure to check your submission on Blackboard to ensure you submitted the correct file after you click SUBMIT.
