Assignment #5
Previously, we’ve investigated the Servo motor. Although this is excellent for strong angular control and readout, the 0-180 range of motion limits its possible uses. Sometimes, we want both the specific angular control as well as continuous motion. For this, we would use a stepper motor.
Reference: Servo library https://www.arduino.cc/en/Reference/Servo
Reference: Servo library https://www.arduino.cc/en/Reference/Servo
Stepper Motors - The Basics
A stepper motor uses four electromagnets to move in discrete steps, as shown below. Each electromagnet fires successively in order to bump the gear up by a “step.”
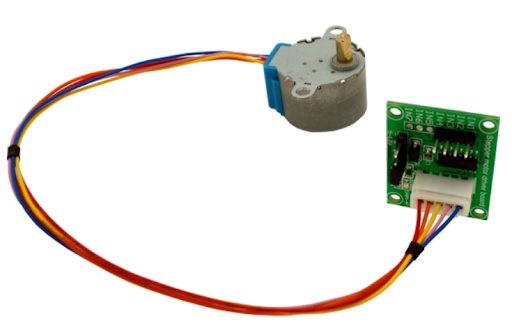
First, we should wire up the stepper. This stepper is designed to work with the green motor control board included in your kit. Connect the wires of the stepper motor to the control board as shown in the picture below.
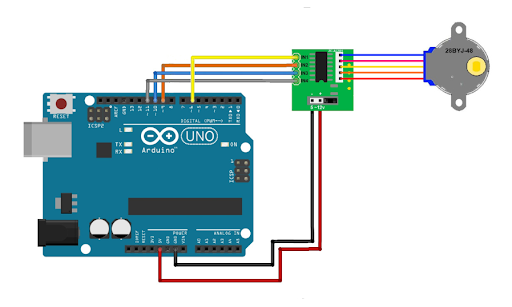
Now, we can wire this up to the actual Arduino. Use your male-female dupont wires to wire up the control board as shown below:
The manual coding of this can get fairly complicated, so we use a pre-built library instead. This library is called stepper, and should be included with your Arduino install. Refer to sketch>include library> Stepper to include the library to your program. As with Servo, the library allows you to create an object Stepper in your code. In order to create such an object, we utilize the syntax below:

This tells my code to create an object of type Stepper (make sure the S is capitalized, the word should turn orange) named whatever I would like to name it- in this case I name it jimothy. This is exactly the same as when you declare an int or bool, but in this case I am creating a Stepper instead of an integer. When I create a Stepper object, I first need to tell it what step refinement the object should use. For the steppers we use in this class, we should always set this to 512. Next, I need to tell it what pins this stepper is connected to. I prefer to use PWM pins (~) so I connect my IN1, IN2, IN3, and IN4 pins on the stepper control board to the 6, 9, 10, and 11 pins respectively.
Important: you must declare these in the order IN1, IN3, IN2, and IN4 because of the paired nature of the magnets.
Now that I’ve created my object “jimothy” I can run functions on it. The first thing I want to do after I create a Stepper is define the speed. I do this with the .setSpeed() function:
Important: you must declare these in the order IN1, IN3, IN2, and IN4 because of the paired nature of the magnets.
Now that I’ve created my object “jimothy” I can run functions on it. The first thing I want to do after I create a Stepper is define the speed. I do this with the .setSpeed() function:

You’ll find that at this step refinement, these steppers can accept speeds anywhere from 0 to 60 rpm. Finally, I can tell the stepper how many steps to move forward by. I do this using the .step() function:

In this case, I decided to move the stepper forward by 512 (our step refinement) times 4 steps, or 2048 steps. As you’ll see, this produces exactly one turn, or revolution, of the stepper. Therefore, I can move my stepper in increments of 90 degrees using my howManySteps variable, step(2*howManySteps) would be 180 degrees, and step(0.5*howManySteps) would be 45 degrees. Alternatively, I can have the stepper move by any arbitrary number of steps, e.g. jimothy.step(250). If you want to know how many steps to move by in order to move a corresponding number of degrees, refer to the following function:
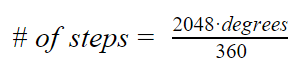
A note about using steppers: You should never round in these calculations. Remember that the stepper does not have a positional sensor like the servo does. Any error you have in your stepping will gradually accumulate. Imagine you take a walk, and every time you take a step you move 2.9 feet forwards, but to make your life easier you estimate that you move three feet forwards. With your estimation, it should only take you 5280/3 = 1760 paces to walk the a mile. In reality, if you take 1760 paces blindfolded, you will still be about 60 paces away from the full mile because you overestimated the length of your pace. With a stepper, there would be no way of knowing that you haven’t gone the full distance until the offset is substantial enough that your device eventually fails. Don’t estimate!
Exercises
Exercise 1: Continuous Turning
Be sure to wire up the Stepper as shown before getting started (use your physical kit for this, not TinkerCAD). We recommend that you attach a piece of tape to the horn (golden piece) of your stepper so you can watch its movement.
- Include the Stepper Library
- Create a Stepper in the global scope
- Only once:
- Define your stepper speed as 40
- Repeatedly:
- Move the stepper forward by 90 degrees.
- Delay 2 seconds
Exercise 1: Output
The stepper should turn continuously, stopping briefly every 90 degrees.
Exercise 2: Back and Forth
- Include the Stepper Library
- Create a Stepper in the global scope
- Only once:
- Define your stepper speed as 40
- Repeatedly:
- Move the stepper forward by 90 degrees.
- Move the stepper backward by 90 degrees.
- Hint: We can change the stepping direction by making the .step() argument negative.
Exercise 2: Output
If you did not include a delay:
The stepper will sweep back and forth, but will not complete the full 90 degree rotation.
If you did add a delay:
The stepper should sweep back and forth by 90 degrees. If it isn’t quite working, your delay might not be long enough.
Be sure to try the exercise with and without the delay. Comment on your observations.
Exercise 3: Stacking Error
- Before you compile this code, unplug the ground wire. Use a pencil to mark on the grey body of the motor the initial orientation of the horn.
- Include the Stepper Library
- Create a Stepper in the global scope
- Only once:
- Define your stepper speed as 40
- Repeatedly:
- Move the stepper forward by 2000 steps.
- Delay 2000 seconds
Short answer: Does the stepper return back to the line you marked? Why or why not?
Exercise 3: Output
With the added delay, we can now see that there is a full 180 degree range of motion. If you’re not seeing this result, try increasing your delay.
Short Answer
- In exercise 3, does the stepper return back to the line you marked? Why or why not?
- What happens if you set the speed to 100? Explain what you think is happening.
Submitting the Assignment
For each of your codes, take screenshots of the IDE, and videos of the stepper movement. Compile your answers and codes into a Word document using the template we provide, and submit as a PDF with zipped together with your videos.
